Showing posts with label Self Sufficiency. Show all posts

Wednesday, October 12, 2011

The Range Reviews: Tactical: Wisdom to Help Prepare for Adversity

The world is changing, are you prepared?

The Range Reviews: Tactical: Wisdom to Help Prepare for Adversity

In preparation for the time that will inevitably fall upon us – sooner or later – every man must rely upon his own imagination, his own projection, and his own initiative. You will be able to come up with your own solutions particularly applicable to your personal conditions in the storm. One thing is certain. You will see the collapse of this inflation and that will mean the end of the era you have known. But you and your country can still be saved.

Best Regards,
Albert A Rasch
Preserving and Tanning Small Hides

Albert Rasch,HunterThough he spends most of his time writing and keeping the world safe for democracy, Albert was actually a student of biology. Really. But after a stint as a lab tech performing repetitious and mind-numbing processes that a trained Capuchin monkey could do better, he never returned to the field. Rather he became a bartender. As he once said, "Hell, I was feeding mice all sorts of concoctions. At the club I did the same thing; except I got paid a lot better, and the rats where bigger." He has followed the science of QDM for many years, and fancies himself an aficionado. If you have any questions, or just want to get more information, reach him via TheRaschOutdoorChronicles(at)MSN(dot)com.

Tuesday, June 21, 2011

Sun Protection and Skin Care for You, the Outdoorsman

Hunting and Fishing in the Sun: Reduce Your Risks!
© 2011 Albert A Rasch and
The Rasch Outdoor Chronicles
$g&m f9bd 45kd q!?5.

Having Fun in the Sun - Safely!

Editor's Note: I've been very fortunate. Though I have spent the majority of my working days out in the sun, I have not suffered any damage... that I can tell. Time though, will tell just how much damage I really have done to my skin.  So allow me to remind you of the dangers, and the simple precautions you can take to safeguard your health. 

As many of you must know, skin cancer is on the rise. Exposure to everyday chemicals, polluted atmospheres, over exposure to the sun, and better record keeping, all have contributed to the rise according to the American Cancer Society. 2 million cases of non-melanoma skin cancer on average are diagnosed each year. 68,000 cases of melanoma, the most serious and lethal type of skin cancer, are within that diagnostic catagory.

Remember when summertime rolls around, we tend to spend far more time outdoors, especially if we love fishing! Long hours on the dock, pier, shoreline, or boat add up to a lot of exposure, especially to the strongest and most harmful ultraviolet sun rays of the year.
There are some simple precausions you can take to reduce the harmful effects of the sun and reduce your chances of skin cancer and damage.
  • Wear a hat.your head and face are the most likely spots to get damaged and suffer skin cancer!
  • Wear long sleeved shirts and pants. If you have ever watched the TV shows of flats fishermen in Florida, you will notice they wear lightweight pants and long sleeve shirts.
  • Use good sunglasses that are polarized. Not only can you see better, but it really helps protect your eyes from flying debris, sand, lures and insects.
  • Use a good sunblock. SPF 30 is the minimum for outdoor work, and you should reapply frequently.

 It's really important to drink plenty of water, and stay hydrated. If you're hydrated so is your skin. And hydrated skin can cool itself more efficiently. 


Following these simple guidelines will lessen the chances of you getting skin skin cancer and keep you enjoying the great outdoors!

Best Regards,
Albert A Rasch
Member:  Qalat City Tent Club
Member: Hunting Sportsmen of the United States HSUS (Let 'em sue me.)
The Hunt Continues...


The Rasch Outdoor Chronicles, Albert A Rasch, Hunting in Florida

Tuesday, May 31, 2011

Hurricane Season Opens

The 2011 Atlantic Hurricane Season Begins

The National Oceanic And Atmospheric Administration (NOAA) has issued a 65% chance for an “active” hurricane season outlook for the Atlantic Basin this year.


The NOAA is projecting a 70 percent probability of the following ranges:

12 to 18 Named Storms (top winds of 39 mph or higher)

6 to 10 Hurricanes (top winds of 74 mph or higher), of which,

3 to 7 could be Major Hurricanes (Category 3, 4 or 5; winds of at least 111 mph)

This outlook underscores the importance of having a hurricane preparedness plan in place.

As the US is still reeling from the deadliest tornado season in history, long-range meteorologist and hurricane forecasters have called for a much more active 2011 Atlantic hurricane season, which begins June 1st, and runs through November 30th (eastern Pacific hurricane season began May 15th and also ends November 30th) with above-normal threats on the U.S. coastline.

Points to Consider:
According the National Oceanic and Atmospheric Administration (NOAA), the average North Atlantic hurricane season consists of nine to fourteen tropical storms. Of those, between four and seven could develop into hurricanes. The NOAA has cautioned that hurricane’s can occur whether the season is active or relatively quiet, but the conditions expected this year have historically produced an active Atlantic hurricane seasons. Be aware that first responders are a critical part of our country infrastructure when disaster strikes.

Each year natural disasters create major problems around the world, with storms and floods dominating the statistics, contributing more than two thirds to the major disasters. Consider that one of the most damaging, and deadly events that can occur is the hurricane. When hurricanes move ashore, they bring with them a storm surge of ocean water along the coastline, high winds, tornadoes, and both torrential rains and flooding. Buildings, trees, power lines, roads and bridges may be damaged or destroyed by hurricane-force winds (74 mph or more). Additionally, debris from the high winds can damage property, block roads, and bridges. Furthermore, widespread torrential rains often in excess of 6 inches can produce deadly and destructive floods, which are not just limited to the coastline, often extending hundreds of miles inland.

From:
Homeland Security Network

Thursday, May 26, 2011

Making Biltong and Jerkey at Home

Making African style Biltong at home!
© 2009 -2011 Albert A Rasch and
The Rasch Outdoor Chronicles

Making Biltong at Home

Picture Credit: Wild Ed's Texas Outdoors
Some time ago, my "compatriota" Mike from Native Hunt asked me about drying meat without smoke or heat. Coincidentally my good friend Ed, over at Wild Ed's Texas Outdoors, happens to have put together a fantastic tutorial on making Jerky American style. Excuse me, make that Texas style! (You might remember that he also did a great tutorial post on European style skull mounts.) Making jerky is a great way to stock up on some healthy snacks after the hunting season is over and it is a great skill to have regardless. Wild Ed's Texas Style Jerky takes you step by step on the artful and tasty way to make some homemade jerky.

Now, I'm a big fan of biltong, and making it via the southern Africa method of drying meats. There is nothing more delicious than the rich taste of meat that a well dried piece of biltong has.

I make my own using a couple of methods. Both are done indoors; one using the AC air handler, and the other a cardboard box and a fan. They both work about the same, though the AC method is about a day or two faster.

First thing you need is a hunk of meat. You can use beef, deer, elk, any of the deers (fallow, axis, etc). This does not work with pork, and for some reason, I seem to recall that it shouldn't be done with pronghorn antelope. I don't remember why, all I do remember is that for some reason, way in the back of my synapses a warning flashes repeatedly...

Cut hunk of meat that will soon be Biltong, with the grain in slices about an inch thick. Now cut them into half inch thick strips. It's easier to slice an inch thick piece off of a large cut, than it is to slice 1/2 inch. The thinner slices come off easily from the flat slab. Sprinkle them well with salt, and put them in a container over night in the fridge. The next day take them out of the fridge, rinse them off and dry them with a paper towel. Now you can use whatever spices you prefer. I like granulated garlic, Old Bay Seasoning, or Everglades Heat on mine. Now it's time to go and dry your biltong.

Using your AC to Dry Meat
With the AC method you need to have an air handler unit that allows you access and enough depth to allow meat to hang freely. It also helps if your wife won't notice the smell of meat, garlic, and pepper wafting throughout the house.

Just hang the meat in the air handler. I used some wire to make a rack inside the air handler.

I have found that paper clips are by far the easiest thing to use to hang the meat from. Just un-bend them into an "S" shape, and skewer the end of the strip on it.

Check the meat often, starting the third day or so. Just slice the end off and see how dry it has gotten.

Building a Box to Dry the Meat
The cardboard box is fairly simple also. Obtain a tall narrow box; the type used by movers is great. They are about eighteen inches square and four feet high. Get some 3/8th inch dowels and space them out two inches apart, about two inches below the top. Cut a slot six to eight inches high and as wide as the box an inch off the bottom. This is the air entry. Now cut slots, one inch in height and about twelve inches wide on each side near the top, these are the exit holes. Open the top, and hang the meat making sure it doesn't touch either the box or an adjoining piece.

Close the top, plug the fan in and aim it at the intake slot, and wait.

Tom of Boomers and BS knows a thing or two about Biltong. He added the following:

"A 40 watt bulb in a proper socket wired safely in a board at the bottom of the box a decent distance below the meat hangers works as well as a fan in a cardboard box if you build it of wood. Some sort of drip screening/drip tray(s) (Maybe a big #10 can with holes in the sides. Albert) over the bulb itself and for general purposes of keeping things tidy helps. Ventilation holes (with screen door mesh behind them to keep flies out) in the box towards the upper end and on the top and pay attention to electrical and fire safety in your design.


Bulb design works better/faster than the fan design in cooler climates. Combination of both works too. Friend of mine built his with a lightbulb and a PC cooling fan to ventilate it."

The way to test the meat is to take slices off the end. If it's not dry enough for you, let it dry another day. I like mine a little on the wet side.

Things to remember, you need to do this in a climate controlled area. In other words, indoors because the relative humidity is constant. My guess is that you could do this outdoors if you knew that you would have stable temperatures and low humidity for four or five days. You just need a constant breeze to carry off any moisture being released."

Tom also added, "In Africa it's usually done open air, outside, in what amount to mesh tents/cabinets to keep the flies off. Not sure about pronghorn but almost all the biltong I have eaten in Africa was from the Antelope family, most especially Impala. Not uncommon for locals to convert near an entire Impala to biltong."

Pepper is a great fly repellent, if you're going to try this outdoors.

Now biltong is delicious, and it is very easy to eat the equivalent of two pounds of meat in a twenty minute sitting. You have been warned!

Best Regards,
Albert A Rasch
Member:Qalat City Tent Club
Member: Hunting Sportsmen of the United States HSUS (Let 'em sue me.)
The Hunt Continues...


The Rasch Outdoor Chronicles


Albert Rasch,HunterThough he spends most of his time writing and keeping the world safe for democracy, Albert was actually a student of biology. Really. But after a stint as a lab tech performing repetitious and mind-numbing processes that a trained capuchin monkey could do better, he never returned to the field. Rather he became a bartender. As he once said, "Hell, I was feeding mice all sorts of concoctions. At the club I did the same thing; except I got paid a lot better, and the rats where bigger." He has followed the science of QDM for many years, and fancies himself an aficionado. If you have any questions, or just want to get more information, reach him via TheRaschOutdoorChronicles(at)MSN(dot)com.

Tuesday, April 26, 2011

Preserving and Tanning Small Hides

How to Tan Small Hides Esaily
© 2011 Albert A Rasch and
The Rasch Outdoor Chronicles
$g&m f9bd 45kd q!?5.


This is a fun and safe project for you to try. Pelts make great additions to a trophy room, can be used as a trade good at rendezvous, and are handy for tying flies.There are tons of references on tanning small hides, so I have consolidated the simplest and safest process.

Things You'll Need to Tan a Small Hide:

A flat piece of wood about an inch or two bigger than the pelt you're working with.
Thumbtacks
A sharp knife with curve to the blade, a dull knife with a curve to the blade.
A Rubbermaid type pan
Rubber or latex surgical gloves
1 pound of kosher type salt for each pelt the size of a rabbit or smaller
A five gallon pail
1 lb. Borax for each pelt
Wooden stick for stirring and pushing the pelts
1 lb. Ammonium Alum or Potassium Alum powder
Neatsfoot oil, bear grease, or mink oil
A baseball bat

Tanning a hide is a pretty straight forward job. Regardless of size, the steps are about the same. I've made the proportions sized to a small pelt like a rabbit or a couple of squirrels. Larger pelts will of course require larger proportions and bigger equipment.

Step One: Scraping the Raw Pelt
In furrier parlance this is called fleshing.Find yourself a comfortable spot to work in. Pin down the pelt, fur side to the board, with the thumbtacks. Using the sharp knife, scrape away as much tissue as possible. You want to remove any fat or muscle tissue that remains. Be careful that you don't cut through the pelt, though undoubtedly you will the first couple of times until you get the hang of it.

Step Two: Salting the Pelt
Remove the pins from the pelt and put it in the rubbermaid pan flesh side up. Put on your gloves, take the Kosher salt, and put a good coat of it on the skin. Rub it in well, and when you are sure you have covered evry bit of it, lay the pelt back, fur side down in the pan, and sprinkle a thin layer of salt onto the pelt. Set it aside for 60 to 72 hours.

After it has sat, liquid may have collected in the pan, and much of the salt may have liquified. Place your pelt on some newspaper, rinse and dry the pan, and set the pelt back down. once again, salt the pelt and work the salt into it. Lay it back down fur side down, and spread a thin layer of salt on the fleash side of the pelt. Set it aside for another 60 to 72 hours.

Step 3: Drying the Salted Pelt
Take the wet salted pelt, and carefully hang it up to dry in a breezy shady place. Never hang a pelt where the sun can hit it. The pelt must absorb the salt, and the moisture in the flesh must be removed slowly and completely.

Step 4: Soaking the Salted Pelt
Now it is time to rehydrate the pelt. Fill the 5 gallon pail with clean water. place the pelt in the water, assuring that it is completely submerged. Place a clean stone on it if need be. Change the dirty water about every thirty minutes or so until the pelt is as soft as it was when you first started, then wait 30 more minutes!

Step 5: Scraping the Hide Once Again
Carefully squeeze as much water out of the now softened pelt as you can. use your board and pushpins and tack the pelt, furside down, to the board. Carefully scrape the inside of the skin again with your sharp knife. Be on the lookout for any remaining tissue that is still attached. It may appear as a shiny film of membrane that is still attached to the skin. When you are done, fold the pelt skin to skin, and set it to one side for a moment.

Step Six: Preserving the Pelt
Rinse out your pail and refill it with tepid water. Put five (5) ounces of borax (20 Mule Team works great!) and stir until it disolves.Put on your gloves, and put the pelt into the borax laced mixture. Gently knead the pelt in the solution and leave it to soak for 24 hours.

Step Seven: Scrape the Pelt Again!
Take the pelt out of the solution and carefully sgueeze the excess solution from the hide. Once again pin it to the board, and now, scrape it carefully with a dull knife. This helps to break down the fibers and is the first start in softening the pelt. When you're done, remove the pelt from the board and rinse the pelt thoroughly.

Step Eight: Preservatives
Measure out about four (4) ounces of borax and four (4) ounces of alum powder. Add just enough water to make a paste. You want a thick paste so add the water a little at a time while you mix it with gloved fingers, breaking up and combining any lumps.

Pin the pelt down one more time, and rub the paste thoroughly into the flesh side of the pelt. Rub hard, you can't get too much on the pelt or over tan it. Set the pelt aside for 24 hours. Use your dull knife and scrape the paste off the hide. Once again rub fresh mixture into the hide. Set it aside and do the same thing three more times, but leave the paste on for three days the last time.

Step Nine: Rinse Well!
When it has sat for three or four days, scrape off the remaining paste, and rinse the hide well. Rinse as many times as you think neccesary to remove all of the borax and alum. again hang it up out of the reach of animals and allow it to dry.

Step 10: Stretch and Soften the Hide
Rub some Neatsfoot oil, bear grease, or mink oil on the slightly damp hide. Using a smooth rounded piece of wood, stretch the hide in all directions to break up the fibers and soften the hide. A baseball bat is good for this. Small sections will have to be manipulated by hand. Occasionally rub more oil into the skin and continue to work the hide until it is soft and supple.

And there you have it, a relatively simple method for tanning hides. It is somewhat labor intensive, but it is safe and can be done by anyone with a little patience.

Best Regards,
Albert A Rasch
Member: Shindand Tent Club
Member: Hunting Sportsmen of the United States HSUS (Let 'em sue me.)
The Hunt Continues...


The Rasch Outdoor Chronicles, Albert A Rasch, Hunting in Florida


Albert Rasch,HunterThough he spends most of his time writing and keeping the world safe for democracy, Albert was actually a student of biology. Really. But after a stint as a lab tech performing repetitious and mind-numbing processes that a trained capuchin monkey could do better, he never returned to the field. Rather he became a bartender. As he once said, "Hell, I was feeding mice all sorts of concoctions. At the club I did the same thing; except I got paid a lot better, and the rats where bigger." He has followed the science of QDM for many years, and fancies himself an aficionado. If you have any questions, or just want to get more information, reach him via TheRaschOutdoorChronicles(at)MSN(dot)com.


Other posts of interest:
Stickbow Archery
Traditional Bows


Friday, April 22, 2011

Chronicles' Project: Waterproofing Fabric 18th Century Style

Waterproofing Fabric: Making Oilcloth the Explorer's Plastic Wrap!
© 2011 Albert A Rasch and
The Rasch Outdoor Chronicles
$g&m f9bd 45kd q!?5.


I've been doing quite a bit of studying about the early 18th century, specifically the early American Colonial era. It turns out that the more I learn, the less I actually seem to know! Everyday brings about a new bit information and another historic fact that I should have known about.


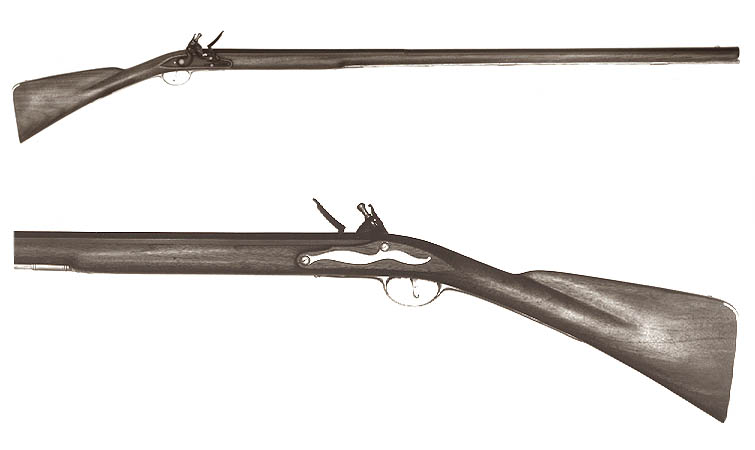
Much of what I am learning revolves around my desire to decorate my home with early American artifacts, or more likely their reproductions. I have ordered a lovely Chambers New England Fowler to build, and I am already eyeballing the Chambers Virginia style rifle for my next flintlock build. I'll get to the Pennsylvania/Kentucky styles when I have a bit more skill as they require an eye for proportion and style, which you can only get from practice and study!

Along with the rifles I sure would like to have some accouterments to go with it. In those days, bushcraft was a way of life, not just a weekend adventure. Things that we may take for granted now-a-days were luxuries or even nonexistent. Slickers, raincoats, weatherproof garments, and shrinkwrap, did not exist, not even in Ben Franklin's fertile mind.

But our forefathers figured out how to manage even without GoreTex and nylon. Among the many things I have learned, and one eminently practical to bushcrafters, is the ability to waterproof fabric.

Many reenactors use historically correct (HC as opposed to PC... And that could be the subject of another post!) methods for waterproofing the fabric they use for haversacks, tents, and outer garments. Reenactors pride themselves on recreating the tools and accouterments of their respective eras. To that end they study extant papers, artifacts, and research through trial and error the methods used in the past.

There are two common ways to accomplish waterproofing; either by using beeswax, or using linseed oil. Turpentine, distilled from the resin of several types of pine trees, is used as a solvent to carry the wax or oil. After it evaporates it leaves the oil or wax impregnated in the material.

Let's work with plain beeswax first. As you are more than likely aware, beeswax is produced by honeybees as the building block of the combs in their hives. Beeswax melts at 150F, and should only be melted in a double boiler for safety. Put your beeswax in a large tin can and put that in a sauce pan of simmering water. That will safely melt your wax and avoid a fire of epic proportions.

You will need a few things to do a good job of using beeswax for waterproofing.

Lots of newspaper to protect everything while you work!
Beeswax
Double boiler: A large tin can inside a saucepan will do for melting your beeswax.
A paint brush or kitchen spatula.
A black plastic trashbag.

Set your beeswax to melt in your double boiler. Set the temperature to low, and keep an eye on it. You want to use it as soon as the last bit of wax melts.

Take the item you wish to waterproof and lay it upon sufficient newspaper to keep any spills contained.

Carefully pour the melted wax upon the item, immediately spreading it with the spatula, or if using a brush paint it on quickly while still hot. If the wax in the can starts to harden, return it to the double boiler until it melts again. Make sure you spread it good and well, looking to make sure you get the wax well into the seams.

Once you've thoroughly covered your item, your piece will look exactly like something that has been covered with wax and it will look pretty bad at that. Now, put it in a black plastic trashbag, and set it in the sun. The black plastic will absorb the heat and melt the wax once again. As it gets hotter the wax will penetrate the fabric, permeating the fibers with wax. Though perhaps not historically correct, it sure is effective.

Another option is to use a hot iron to melt and force the wax into the fabric. Start as before, spreading the melted wax and then use the iron to heat up the wax and fabric, allowing the wax to penetrate completely. BTW once you have used your iron to do this, you would be well advised to go get a replacement before the Mrs uses it...

Turpentine will dissolve beeswax and act as the carrier for it. This is another technique used in the past.Take a pound of beeswax and shave it into little bits and pieces, then dissolve it in a quart of turpentine. Take a paintbrush, and "paint" the solution onto your object. When your item has absorbed as much as it can, hang it up to dry and allow the turpentine to evaporate from the material. This may take up to two or possibly three weeks!

Linseed oil is a clear to yellowish oil obtained from the seeds of the flax plant. It is mechanically pressed/squeezed/squashed until all the oil is extracted without the use of external heat. Linseed is awesome because it polymerizes as it oxidizes, becoming in essence plasticized. Boiled linseed oil, frequently used in fine gunstock finishing, has been heated and thickened, causing it to polymerize more quickly.

Oilcloth, was frequently the plastic wrap of the 1700s. Windows were covered by it and products for market were covered with tarps of oilcloth. Many clothing articles were made from it.

A simple method to create oilcloth, would be to dunk the fabric in straight linseed oil. Effective, but slow to dry. Better yet, cut the linseed oil with turpentine at a rate of two parts linseed oil to one part turpentine. I would suggest that you use a large baking dish, pour the oil mixture onto the fabric, and then roll it in with a three or four inch roller. This will ensure that the oil penetrates the fiber, and minimize the amount of wasted oil. When finished either lay it out flat or hang carefully and allow it to dry completely. In the case of a haversack hang it in such a way as it stays open. Adding Iron Oxide pigment to the mixture will result in a common 18th to 19th century paint. Use one cup of Iron Oxide to a quart of linseed oil.

Please remember that linseed oil is highly flammable. Your project, paint brushes, fabric scraps, or papers saturated with linseed oil can spontaneously combust as the oil dries and oxidizes , leading to a conflagration and major insurance bill. When you are done take every piece of scrap fabric or paper, and hang them out to dry, or lay them out flat. After they are good and dry, throw them away.

I'm happy to be able to share something else that I've managed to dredge up and out of obscurity. When I make an 18th century styled game bag, or haversack, I will try this and present it here for your discussion and approval!


Best Regards,
Albert A Rasch
Member: Shindand Tent Club
Member: Hunting Sportsmen of the United States HSUS (Let 'em sue me.)
The Hunt Continues...


The Rasch Outdoor Chronicles, Albert A Rasch, Hunting in Florida

Tuesday, January 25, 2011

How to Smoke Fish: Two Methods.

How to Smoke Fish at Home!© 2011 Albert A Rasch and
The Rasch Outdoor Chronicles
and Seafood NIC
$g&m f9bd 45kd q!?5.

Smoking Fish 


Smoked fish are fish that have been cured by smoking. As part of our Self Sufficiency series, we have researched the process for smoking fish for our faithful and errudite readers. The preservation of fish has been an integral part of every culture that subsisted on fish. Over thousands of years, man has perfected the art of drying, salting and smoking fish. The fisherman's catch, if properly preserved, can be an exciting addition to family meals over an extended period of time; when properly done smoking will preserve fish for several weeks or even months. Smoking is not only one of the oldest methods of preserving fish, but an excellent way to preserve fish that you don't plan to or cannot eat immediately. The fish dries an it hangs over a smoldering fire while the smoke infuses it with its distinct aroma and flavor. Not only does the wood smoke add flavor, it also adds color. The brining process that precedes smoking, helps to preserve the fish.

Wednesday, January 19, 2011

Drying and Preserving Fruit

© 2011 Albert A Rasch and
The Rasch Outdoor Chronicles
$g&m f9bd 45kd q!?5.

Quick Facts on Drying Fruit...
  • Successful drying depends on heat, air dryness and good air circulation.
  • Select fresh, fully-ripened fruits.
  • Pretreat fruit pieces by dipping in an ascorbic acid, citric acid, or lemon juice solution.
  • When dry, allow fruit to condition for four to 10 days before packaging for storage.
  • Package dried fruits in tightly sealed containers and store in a cool, dry place.

Drying has to be the simplest, most cost efficient, and most natural method of preserving food. I was able to get the basics on drying fruit from Carol W. Costenbader, the author of The Big Book of Preserving the Harvest.  Drying is a creative way to preserve foods and use home-grown fruit, extra produce (e.g., ripe bananas) and roadside market specials. Like all methods of preservation, drying causes some nutrient loss.

Here are seven easy steps from selection of the fruit, to storage of your dried treasure!
1. Select the Fruit
Use only blemish-free fruits that are fully ripened. Immature produce lacks flavor and color. Overmature produce can be tough and fibrous or soft and mushy. Drying does not improve food quality.

2. Prepare the Fruit
Thoroughly wash and clean fruits to remove dirt or spray. Sort and discard any fruit that shows decay, bruises or mold. Such defects can affect all foods being dried. Now, pit and slice the fruit again discarding any pieces that do not meet quality expectations. The smaller the pieces, the quicker they will dry, but keep all pieces uniform in size so they’ll dry at the same time.

3. Pretreating
Pretreating fruits prior to drying is highly recommended. Pretreating helps keep light-colored fruits from darkening during drying and storage and it speeds the drying of fruits with tough skins, such as grapes and cherries.

As indicated below, some methods work better for some fruits than others.

Blanching (apricots, apples)
Put slices in a steamer (or a colander suspended in a pot of boiling water) for five minutes then place fruit in ice water to stop the cooking. Drain and dry on towels.

Ascorbic Acid Dip (all fruits)
Ascorbic Acid Pretreatment: Ascorbic acid (vitamin C) is an antioxidant that keeps fruit from darkening and enhances destruction of bacteria during drying. Pure crystals usually are available at supermarkets and drug stores. Stir 2 1/2 tablespoons (34 grams) of pure ascorbic acid crystals into one quart (1000 milliliters) of cold water. For smaller batches prepare a solution using 3 3/4 teaspoons (17 grams) of pure ascorbic acid crystals per 2 cups of cold water. Vitamin C tablets can be crushed and used (six 500 milligram tablets equal 1 teaspoon ascorbic acid). One quart of solution treats about 10 quarts of cut fruit. Cut peeled fruit directly in ascorbic acid solution. Soak for 10 minutes, remove with a slotted spoon, drain well and dehydrate. Research studies have shown that pretreating with an acidic solution enhances the destruction of a host of potentially harmful bacteria during drying, including E. coli, Salmonella species and Listeria!

Pectin dip (peaches, berries, cherries)
Mix 1 box of powdered pectin with 1 cup water. Boil together for 1 minute, then add ½ cup sugar and enough cold water to make 2 cups.

Honey dip (bananas, peaches, pineapples)
Mix 3 cups waters and 1 cup sugar. Heat and then add 1 cup honey. Stir well.

 Juice dip (peaches, apples, bananas)
Combine 1 quart pineapple juice, 1 quart lukewarm water and ¼ cup bottled lemon juice.

4. Drying

Sun Drying
a) Spread your sliced or cubed fruit on a screen for two to four days, turning slices over half way through the drying process.
b) Don't forget to bring your screens inside at night to keep dew from collecting on the fruit. (Or coons stealing them!)
c) This method works best in climates with 100 degree heat and low humidity.

Oven Drying
a) You can place fruit directly on the racks or first spread cheesecloth over the oven racks.
b) Set the oven to 145 degrees and prop the door open with a wooden wedge (about a half inch) to allow the moisture to escape.
c) Give it anywhere between 4 to 12 hours, checking regularly to see how the fruit is drying.
d) Food should be dry but pliable when cool. Test a few pieces to see if the batch is ready.

5. Curing
When done, place your dry fruit in an open bowl in a warm and dry location where there is some air movement. Cover it with a piece of cheese cloth to minimize dust or insects landing on your dried fruit. Flip it around once or twice a day for a couple of weeks.

6. Pasteurize
You need to pasturize your dried fruit in order to store it for any great length of time; this will insure that you destroy any insect eggs. When drying is complete and you have cured your fruit slices, freeze the fruit for several days at zero degrees in a deep freeze. It must be a deep freeze as a regular refrigerator cannot get the temperature down far enough. Alternatively, heat in a 175 degree oven for 10-15 minutes.

7. Storage
Store in airtight ziplock bags or glass containers kept inside paper bag to protect from light. Store in cool dry place. Since a refrigerator is cool and moist, keep the dried fruit there only in the heat of summer, but make sure the package is air tight.

There you have it my friends. Simple process that yields yummy and nutritious results. It is a great way to preserve fruit, take advantage of sales, and generally speaking is a great skill to have.


Other Posts of Interest:
Planting Fruit Trees
TROC II: Drying and Preserving Fruit

Best Regards,
Albert “Afghanus” Rasch
The Rasch Outdoor Chronicles
In Afghanistan


The Rasch Outdoor Chronicles


Scott Croner Albert A Rasch Albert “Afghanus” Rasch Albert A Rasch Scott Croner Nebraska Hunting Scott Croner, Merriam's Turkey Hunting Albert A Rasch Scott Croner Albert A Rasch Albert “Afghanus” Rasch Albert A Rasch Scott Croner Nebraska Hunting Scott Croner Merriam's Turkey Hunting Albert A Rasch

Monday, December 20, 2010

Catch Your Own Stone Crabs!

© 2010 Albert A Rasch and
The Rasch Outdoor Chronicles™
$g&m f9bd 45kd q!?5.

Trapping and Catching Stone Crab

Florida Fishing, Albert Rasch, The Rasch Outdoor Chronicles, best fishing in Florida
I got to thinking about some of the really delicious things that come out of the ocean, especially after a great day of the best Florida fishing! Among them is the oh so delicious Stone Crab Claws! For those of you who live here in Florida, and maybe some of you who are visiting, I thought I would put together some of the tips and tricks we use to harvest some succulent claws. The season for Stone Crab is currently open and stretches from October 15 to May 15.

The retail price of Stone Crab claws is always high. We have always enjoyed fresh claws and used to make it a point to go occasionally with friends on a foray for them using either commercially made inexpensive traps or snorkleing gear to dive for the Stone Crabs.

The Florida Fish and Wildlife Conservation Commission (FWC) allows anyone with a recreational fishing license to possess up to 1 gallon of claws (By the way, you can only harvest the claws, the crab MUST be released unharmed) per person or 2 gallons per vessel, whichever is less.

Again, here are two methods that you can use to catch a Stone Crab Claw dinner. You can put out your own traps or dive for the crustaceans.

  • Florida law allows any recreational angler to use up to five stone crab traps.
  • The rules for recreational traps are simple and straightforward, and must meet the following criteria:
  • Buoys must have a legible "R" at least two inches high, permanently affixed to them.
  • Traps must have the harvester's name and address affixed to them in legible letters.
  • Traps must be retrieved manually during daylight hours.
  • Traps cannot be placed in navigational channels or waterways.
  • Each trap must have a degradable wooden panel equal to the size of the entry hole on the top of the trap. This panel is designed to rot away and allow crabs and other creatures to escape should the trap ever be lost. This avoids it becoming a ghost trap.
Florida Fishing, Albert Rasch, The Rasch Outdoor Chronicles
Most bait and tackle shops carry prerigged plastic and wire traps. A single trap is usually less expensive than cost of a pound of claws at your local supermarket, even in Florida!

When situating your traps, look for rocks, cover like some old tires or a shallow wreck, or sand bottom for the best results. Use large fish heads for bait as they will usually last a week, which makes it easier for you to keep up with the traps. Half a ladyfish is also very good, as is a good sized Jack Cervalle.

I would suggest that you set up all of your traps (up to five, remember) in a line about one hundred feet apart, and record the GPS coordinates at each end. Give your traps three to five days, and check them. This will give the crabs time to find your traps and enter.

Snorkleing takes a little practice, but is loads of fun! Not only will you see all sorts of marine life, but you will recover TONS of fishing gear! Seriously. Shallow rock piles and jetties are great places to started at, and of course great places for fishermen to snag and lose gear. Be careful though. Dont get tangled up in any fishing line, or snagged by a rusty old hook. Bring diagonal cutters and a mesh bag for any treasures you come upon.

Check along the bottom edge of the rocks and examine each hole for the telltale sign of the crabs. If a Stone Crab occupies the hole, you will usually see sand and broken shells littered about the the opening of his excavation.

Most divers use a short metal or heavy plastic rod with a 90-degree or more angled end to reach behind the crab and pull it out. Remember, that anything less than 90-degrees is considered a hook and is therefore illegal!


Image Credit: Pinellas Marina 
Stone crabs move fairly slowly, so in most cases you can pull them out and into the open before they clamp down on your fingers should you allow the unthinkable to happen. Once you have pulled them out of their hiding place, release them in a clear spot on the bottom. Thus exposed, they assume a defensive posture and they will raise their claws waving them up toward you to ward you off. Now grab a claw in each of your hands.

Now you have your hard won crab!  But before removing the claws, by law you must measure the claw and make sure it is over the minimum size required. . The minimum claw size is 2 3/4 inches measured from the lower tip or "finger" to the first elbow joint. At no time may you remove claws from any egg bearing females. A minor twist of the claw will cause the crab to release it so be careful when handling especially if you aren't sure they are legal size. Once you are ready to remove the claw, twist it toward the center of the crab and up. I have always avoided removing both claws, I only take one. Some folks say it doesn't matter, but I just don't feel right about takeing both claws. Call me a softy.

Note: I just found this!
Studies by the state of Florida have shown that removing both claws do not harm the Florida stone crab in any way when removed properly. In fact numerous studies have shown that by removing both claws, Florida stone crabs are forced to eat sea grass which has been proven to be more healthy for their diet and regenerate their claws faster and female Florida stone crab have more baby stone crabs since they are unable to fend off the advancements of the male crabs. Now that I have science to rely on I can create double amputees without any guilt! Study here.

Try to release your clawless crab close to the rock pile you harvested them from. If you got them from a sand bottom area, try to find the closest rocks or jetty and release them there. The abundance of food and cover will allow them to regenerate more quickly.


Florida Fishing, Albert Rasch, The Rasch Outdoor Chronicles
Do not put your harvested claws on ice. Putting them on ice will cause the meat to stick to the shell. Set the claws into an empty cooler that has some ice in a container to keep it cool. I have seen people keep them in an empty bait well.

Our next installment on Stone Crabs will be preparing them for the table!


Until then, Good Hunting, and Great Fishing!

Best Regards,
Albert A Rasch
Member: Shindand Tent Club
Member: Hunting Sportsmen of the United States HSUS (Let 'em sue me.)
The Hunt Continues...


The Rasch Outdoor Chronicles, Albert A Rasch, Hunting in Florida


Albert Rasch,HunterThough he spends most of his time writing and keeping the world safe for democracy, Albert was actually a student of biology. Really. But after a stint as a lab tech performing repetitious and mind-numbing processes that a trained capuchin monkey could do better, he never returned to the field. Rather he became a bartender. As he once said, "Hell, I was feeding mice all sorts of concoctions. At the club I did the same thing; except I got paid a lot better, and the rats where bigger." He has followed the science of QDM for many years, and fancies himself an aficionado. If you have any questions, or just want to get more information, reach him via TheRaschOutdoorChronicles(at)MSN(dot)com.

Wednesday, December 15, 2010

QDM: Fruit Bearing Trees for your Land

© 2010 Albert A Rasch and
The Rasch Outdoor Chronicles™
$g&m f9bd 45kd q!?5.

Planting Fruit and Nut Trees

I know it's only Christmas, but it's a good time to plan your spring planting for fruit bearing trees. We all know that deer love the carbohydrates from ripening fruit, and a good stand will draw them from miles away. A well planted and designed orchard will not only provide an irresistable food source for deer, (And other game too!) but will definitly increase the value of your property! While it does take longer to get an orchard established, the long term cost is much reduced compared to other food plots. Maintainance is less, and the production can be quite long depending on the species of tree planted.

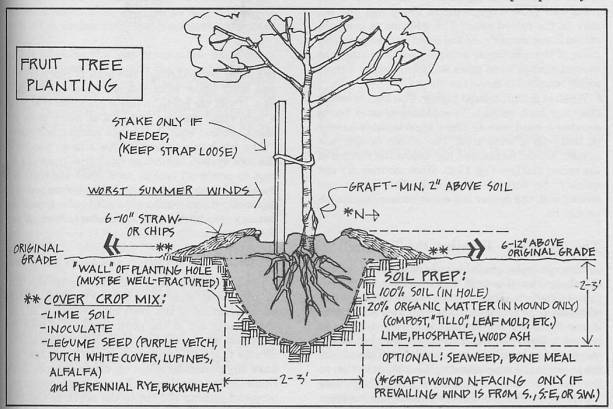
It is important to realize that planting fruit trees from bare root stock can take many years to produce. If you have the time and inclination to wait, then you can purchase many at a good price. The other option is to buy potted trees that may be ready to produce within a couple of years, maybe that same fall! All you need is a shovel to dig the hole it will be in, a bucket for water, and a handful of fertilizer to get it started.

Actually, it is a little more involved than that! But not by much. Realize that bareroot stock, even though it is dormant, is still very delicate. The most important thing to remember is to protect the roots from any moisture loss!  Even when transporting them to their new site, keep the roots covered,  protected and moist.

If you need to keep the bareroot trees more than a couple of days before you can plant them, bury them in a moist medium like peatmoss and sand, or potting mix. This will keep them safe until you can plant them. Make sure it's in a shady spot, and water them well. Of course protect them from any possiblity of freezing. You can actually keep them like this for a few weeks, but you must plant them before they show any signs of growth! Before you plant them, soak the roots in water overnight.

If you have the opportunity, pre dig the holes where you want to plant your orchard. This will minimize any possibility that your trees' roots may dry out.

Two stakes to either side are better...

It would not be a bad idea to bring a couple of stakes, and some raffia or manila twine to stabilize the newly planted tree. You will also need something to protect the trunk from rodents. Some inexpensive hardware cloth wrapped around the trunk is an easy to use barrier against the gnawing teeth of rodents.

The next question you must ask yourself is where in particular are you going to plant your orchard.

You want to make sure you plant the trees in a well drained area. I had to create mounds about 18 inches high to get my orange trees high enough above the water table here in Florida. The persimmons I planted are on a slight rise, but I mounded them also. You may or may not need to do the same, but it is important that drainage is adequate. Fruit and nut trees need sunshine in order to give you maximum production. So you may need to do some clearing in order to maximize the potential of your orchard. Without adequate sunlight, you cannot eapect your trees to reach their best production rates.

You know, before you dig that first hole, you really should plan for your stand placement. Don't plant a beautiful, productive orchard, and then realize you have no place for a stand or hide! You should be aware of the other assets in your area, beds, runs, rub lines, fences, and plan accordingly.

Remember to study the types of trees you will be planting, taking into consideration size at maturity, when they ripen, the number needed for adequate pollination, etc. For those of you in the North, apples in particular are known to have early, mid, and late season varieties which will drop fruit over several  months, giving you an incredible season of opportuity!

(I'm a big fan of the American Persimmon; Native Americans loved them, and they are a popular food for wild turkey, mockingbirds, deer, squirrels, and all sorts of other wildlife! They are a largeish tree, growing to sixty feet, and they definitly need to be planted with others as they are either male or female.)

I would suggest that fruit and trees are one of the best improvements and investments you can make to your property. Over the long term, they are a low maintenance crop that deer will concentrate on. Not only that, but an established orchard carefully situated, and producing deer consistently will add immeasurably to your enjoment, and to your property's value!

Best Regards,
Albert A Rasch
Member: Shindand Tent Club
Member: Hunting Sportsmen of the United States HSUS (Let 'em sue me.)
The Hunt Continues...


The Rasch Outdoor Chronicles, Albert A Rasch, Hunting in Florida


Albert Rasch,HunterThough he spends most of his time writing and keeping the world safe for democracy, Albert was actually a student of biology. Really. But after a stint as a lab tech performing repetitious and mind-numbing processes that a trained capuchin monkey could do better, he never returned to the field. Rather he became a bartender. As he once said, "Hell, I was feeding mice all sorts of concoctions. At the club I did the same thing; except I got paid a lot better, and the rats where bigger." He has followed the science of QDM for many years, and fancies himself an aficionado. If you have any questions, or just want to get more information, reach him via TheRaschOutdoorChronicles(at)MSN(dot)com.

Wednesday, August 5, 2009

Get in Shape for Hunting

© 2009 Albert A Rasch and
The Rasch Outdoor Chronicles
.Training for Endurance

Train Your Way to Better Hunting
Train for Endurance

US Army Training Center & Fort JacksonImage via Wikipedia


After seeing the Bear at Fort Jackson, I was motivated by the lines of recruits scampered to and fro while being yelled at, their bodies being forged and hammered by their kind and conscientious drill sergeants, and finally drawn and tempered into finely honed fighting members of the United States Army. I'm telling you, it was as if I was reliving my youth as I watched the activities, washing down my slice of stuffed crust, extra cheese, Italian sausage pizza with a Super Big Gulp of Pepsi.

As I looked down at my extended midline, I was reminded of the fact that hunting wild game can be an athletic adventure, and I should plan on getting myself in shape before the season starts. Quite frankly I'm in decent shape, my blood pressure is low, cholesterol is low, and overall I'm pretty good. But my endurance is not what it once was. And endurance is what determines what physical demands you can place on your body.

Image: acetosa
I spend a lot of time behind the keyboard when I am at home, and I spend a considerable amount of time sitting while driving and while at work. I'm sure many of you do the same. I did a little research and decided it was high time I not only got back in shape, but make a change in the way I have been leading my life. No I am not going vegetarian, nor am I going to give up calzones, lasagna, chocolate chip cookie dough ice cream, and big hunks of red meat. What I am going to do is get regular exercise, and moderate my intake of food.

The goal is to design a program that will reflect the needs of a hunting sportsman, build up endurance, and tone up the muscles. Remember we are not looking for gains in size and large increases in strength, we want endurance.

Repetition and time are the key ingredients of endurance. But how are we going to go about it?
Image: MoonJazz
Rules of the Game:
You have to have a modicum of discipline.
You must think before you act.
It helps if you have a partner that's willing to support you.
Write down your plan of action.
Then get started!

First things first. Decide you want to do this. If you can't make even a small commitment to the regimen then forget about it. You must decide you are going to make time every day to get yourself back in shape. Decide if anyone else is with you on this. The truth is it is easier if you have someone that will do it alongside you.

So where are you now? Don't even think of going out there and doing a Rocky in the Russian mountains or anything like that. Let's think before we act!

If you've been on your rear end for the last nine months, then a little walking might be the way to go. Get a decent set of hiking boots, if that is your proclivity, but wait a while before you lace them on. Let's start with sneakers or walking shoes. You will also need a watch that is easily read, or a stopwatch.

Find a place where you can walk undisturbed and proceed to take a brisk and invigorating walk. Go from point A to point B and time it. Use that as your initial marker. Now try to do a little more a little faster every day. Once you are motivating for thirty minutes at a good pace, switch to those hiking boots. Make sure you have good socks on and that the boots fit is correct. I recommend Darn Tough Vermont socks which are by the way the Official Socks of The Rasch Outdoor Chronicles.

Make sure you do some moderate stretching before you start, each and every time it really does help prevent injuries.

See if you can find a piece of 1.25 or 1.5 inch black iron pipe that's about 3 foot long. Nice to carry a bit of weight in your arms to simulate that rifle during season.
Image:100pushups
A great tip I picked up is the 5 repetition push-ups during those moments between TV shows, or between desk and door. It's not enough to make you sweat or get out of breath, but it is enough to help you gain strength. You can increase them little by little over the summer and into the fall. I'm up to 25 reps, and I do them 3 to 5 times per day. It takes less than 20 seconds, and considering I started at ten sloppy ones a few weeks ago, I'm pretty pleased.

The other exercise I recommend is the good old sit up. Abdominal strength is the key to core strength, and ultimately determines factors like back strength and alignment, and hip alignment. These factors help with your balance and help prevent and minimize back injuries.

Wedge those feet under a piece of furniture, keep your knees bent, and fold your arms across your chest. Don't pull your chin into your chest as you lift, just bend it modestly as you start to lift off. Suck that gut down to your spine as your shoulders leave the ground and continue the lift in a controlled manner. Go back down in the same controlled fashion. Do what you can with proper form, and add to it as your strength increases. Sit ups are my evening exercise and I try to do as many as I can the first time, and follow it up with a set or two more, doing as many as my abs will allow.

Back in my Army days we used to "slap our boots." Basically we would squat, back relatively straight, until we could swat the top of our boots. This is a great exercise that you can do at any moment, quickly, and with great effect. It works your quads well, and helps with balance. I do ten reps whenever I remember. You can do them slow, or pick up the pace when you're in a hurry.

I thought of this a little while ago. We tend to stick to things we like. Don't fall into the trap of only doing what you like or are good at. Try to work on every part equally! Legs, abs, upper-body, they are all equally important.

That's my current regimen; walking, push ups, sit-ups, and squats. I do other odd-ball things as the mood or opportunity strikes me like pull-ups, chair dips, arm raises, and jumping jacks. Anything at anytime that is convenient. The key is to be doing something constructive and healthy for your body.

Stop and think for a moment how much time you spend doing a good job for your employer, or how much time you spend keeping that car or boat in great shape, or blogging. Don't you think you deserve the same care and consideration?

Repetition is the key to endurance. Keep adding repetitions as you gain in strength and endurance and before you know it, even the Mrs will notice the improvements in your physique...


SO WHAT ARE YOU WAITING FOR? GET UP AND SLAP THOSE BOOTS!!!

NOW!


The Rasch Outdoor Chronicles

Wednesday, April 1, 2009

Making Jerky, Making Biltong; Either Way it Tastes Great!

© 2009 -2011 Albert A Rasch and
The Rasch Outdoor Chronicles
$g&m f9bd 45kd q!?5.

Some time ago, my "compatriota" Mike from Native Hunt asked me about drying meat without smoke or heat. Coincidentally my good friend Ed, over at Wild Ed's Texas Outdoors, happens to have put together a fantastic tutorial on making Jerky American style. Excuse me, make that Texas style! (You might remember that he also did a great tutorial post on European style skull mounts.) Making jerky is a great way to stock up on some healthy snacks after the hunting season is over and it is a great skill to have regardless. Wild Ed's Texas Style Jerky takes you step by step on the artful and tasty way to make some homemade jerky.

Now, I'm a big fan of biltong, and making it via the southern Africa method of drying meats. There is nothing more delicious than the rich taste of meat that a well dried piece of biltong has.

I make my own using a couple of methods. Both are done indoors; one using the AC air handler, and the other a cardboard box and a fan. They both work about the same, though the AC method is about a day or two faster.

First thing you need is a hunk of meat. You can use beef, deer, elk, any of the deers (fallow, axis, etc). This does not work with pork, and for some reason, I seem to recall that it shouldn't be done with pronghorn antelope.

Cut it with the grain in slices about an inch thick. Cut them into half inch thick strips. Sprinkle them well with salt, and put them in a container over night in the fridge. The next day take them out of the fridge, rinse them off and dry them with a paper towel. Now you can use whatever spices you prefer. I like granulated garlic, Old Bay Seasoning, or Everglades Heat on mine. Now it's time to go and dry your biltong.

With the AC method you need to have an air handler unit that allows you access and enough depth to allow meat to hang freely. It also helps if your wife won't notice the smell of meat, garlic, and pepper wafting throughout the house.

Just hang the meat in the air handler. I used some wire to make a rack inside the air handler.

I have found that paper clips are by far the easiest thing to use to hang the meat from. Just un-bend them into an "S" shape, and skewer the end of the strip on it.

The cardboard box is real easy also. Obtain a tall narrow box; the type used by movers is great. They are about eighteen inches square and four feet high. Get some 3/8th inch dowels and space them out two inches apart, about two inches below the top. Cut a slot six to eight inches high and as wide as the box an inch off the bottom. This is the air entry. Now cut slots, one inch in height and about twelve inches wide on each side near the top, these are the exit holes. Open the top, and hang the meat making sure it doesn't touch either the box or an adjoining piece.

Close the top, plug the fan in and aim it at the intake slot, and wait.

Tom of Boomers and BS knows a thing or two about Biltong. He added the following:

"A 40 watt bulb in a proper socket wired safely in a board at the bottom of the box a decent distance below the meat hangers works as well as a fan in a cardboard box if you build it of wood. Some sort of drip screening/drip tray(s) (Maybe a big #10 can with holes in the sides. Albert) over the bulb itself and for general purposes of keeping things tidy helps. Ventilation holes (with screen door mesh behind them to keep flies out) in the box towards the upper end and on the top and pay attention to electrical and fire safety in your design.

Bulb design works better/faster than the fan design in cooler climates. Combination of both works too. Friend of mine built his with a lightbulb and a PC cooling fan to ventilate it."

The way to test the meat is to take slices off the end. If it's not dry enough for you, let it dry another day. I like mine a little on the wet side.

Things to remember, you need to do this in a climate controlled area. In other words, indoors because the relative humidity is constant. My guess is that you could do this outdoors if you knew that you would have stable temperatures and low humidity for four or five days. You just need a constant breeze to carry off any moisture being released."

Tom also added, "In Africa it's usually done open air, outside, in what amount to mesh tents/cabinets to keep the flies off. Not sure about pronghorn but almost all the biltong I have eaten in Africa was from the Antelope family, most especially Impala. Not uncommon for locals to convert near an entire Impala to biltong."

Pepper is a great fly repellent, if you're going to try this outdoors.

Now biltong is delicious, and it is very easy to eat the equivalent of two pounds of meat in a twenty minute sitting. You have been warned!

Best Regards,
Albert A Rasch
Member: Kandahar Tent Club
Member: Hunting Sportsmen of the United States HSUS (Let 'em sue me.)
The Hunt Continues...


The Rasch Outdoor Chronicles


Albert Rasch,HunterThough he spends most of his time writing and keeping the world safe for democracy, Albert was actually a student of biology. Really. But after a stint as a lab tech performing repetitious and mind-numbing processes that a trained capuchin monkey could do better, he never returned to the field. Rather he became a bartender. As he once said, "Hell, I was feeding mice all sorts of concoctions. At the club I did the same thing; except I got paid a lot better, and the rats where bigger." He has followed the science of QDM for many years, and fancies himself an aficionado. If you have any questions, or just want to get more information, reach him via TheRaschOutdoorChronicles(at)MSN(dot)com.