Just a quick link to Rick's post on Lyme Disease Prevention:
Whitetail Woods: Look before you Scratch
Lyme Disease, Deer Ticks, Protect Yourself Against Lyme Disease

Saturday, April 17, 2010
Friday, April 16, 2010
The Rabid Outdoorsman is now a Registered Guide!

Let him tell us in his own words!
"...my passing today of what has been described as the “Toughest Test” . . . the Maine Guide Examination. 1 ½ hours of oral testing followed by a 260 question written test. The total “experience” took me over 2 ½ hours but in the end I succeeded!"
Congratulations on a job well done!
Best Regards!
Albert
Making a Powder Horn Pt II: A Chronicles' Project
© 2010 Albert A Rasch and
The Rasch Outdoor Chronicles
$g&m f9bd 45kd q!?5. trochronicles.blogspot.com

In Part I we started on our powder horn, and got as far as carving down to the tip. In this installment we'll get the horn itself finished, and get started on the parts.
 As I mentioned in Part I, many traditional powder horns have the spout is carved directly from the horn itself. Note the shape of the tips in the adjacent pictures. Those are carved directly from the thick portion of the horn tips.
After quite a bit of whittling, rasping, scraping, and sanding, I had what amounted to what I thought might be a pretty reasonable tip to the horn.
Now that the basic shape has been determined, the center of the spout is marked, and the first hole can be drilled.
I have to be honest; drilling the initial hole for the spout had me nervous. As you can obviously tell, the hole runs at an angle through the tip and trying to drill that and come out in the middle of the cavity isn’t hard, but it’s sure as the devil himself not easy either. You really have to think about what you are doing.
I ended up going at it from both ends. I measured the angle and depth that the spout hole had, and marked that with tape on the horn itself. Then I got a long drill bit substantially larger than the one used on the spout end and drilled to the initial bore from inside the horn.
 Mark the center of the horn where you cut it off . Remember the old adage, "Measure twice, drill once." That should keep you out of trouble. Notice the angle I am holding the drill at, and notice also the tape to mark how far I should drill. I don’t want to go through the opposite side. Start with a 1/8” th drill and bore dead center into the flat you cut. Move up to a 3/16th , then to a ¼, and finish there or go up to 5/16th. With some luck you have managed not to pierce the side of your horn, or yourself. If by some calamity you do go through the side there is a solution that we will cover later. If you happen to break the drill in the horn, get out the torch and heat the stub red hot. It will burn itself loose and you can pull the bit out with needle nose pliers. Don't ask how I learned that trick...
That's probably enough for the day. Go wash up and pick it up tomorrow!

After I drilled the spout hole, it was time to finish it up. More carving, whittling, rasping, filing and scraping! In the end I had what I think is a pretty attractive spout. It's a little short, and really not that svelte, but for a first try it's pretty good. I have not decided what direction I am going to take with that ring I created. Maybe decorative flats, or a tab to attach the sling to.
Now let’s work on the butt end of the horn.
You have cut it square and knocked down any ridges inside. Use some coarse sandpaper, and then finish the inside so it is smooth by scraping. You need to get it pretty smooth for about half to 3/4 of an inch so that the back plug sits securely and seats full depth.

When horn is boiled it softens, becomes plastic, and can be molded to shape. But before we can round out the back end of the powder horn we have to make a “sizer.” A sizer is nothing more than a tapered piece of wood that is used to form the softened horn into a perfect circle. I would suggest looking for an old baseball or softball bat that you can cut down. It’s perfect. Otherwise you will have to whittle it out of a chunk of wood or a relatively round branch. I had a chunk of a branch sitting in the garage which I pinned in the lathe, and tapered to fit.

You will notice that all my turning tools are old files that I ground down for use as skews, scrapers, and cutters. The handles are cut offs from broken shovel handles I save, or tree branches. One of my "signatures" on turned handles is a little bit of bark or knot that I leave whenever possible. I think it's a nice touch. You will learn what angle works best on the leading edge of the cutters by trial and error. I wish I could be more specific, but it seems to be different for the tool and the wood you're cutting into. I'll have to write a post on them specifically because they are relatively easy to make, all you need is a grinder and an old file, but have a couple of nuances that you need to be aware of to make them work well.
 Boil the horn until it softens enough for you to mold. Wearing gloves or kitchen mittens, carefully work the horn over the sizer. Try not to force it out of its natural taper, but do get it round. It would not hurt to wax the sizer well. When the horn cools, it will definitely get a grip on the sizer.
I have read that horn brought to 325 degrees F will lose all memory of its shape, whereas boiling in water to 212 F only temporarily changes the shape. In order to get to that 325 temperature, you will need to heat the horn in the oven, in a pot of oil. Boiling in water is good enough for me… For special shapes such as triangular or rectangular cross sections it is necessary to do the oil bath, so that the horn retains its shape.
The back end should now be perfectly round in shape. Time to close it up. Here you can let your imagination run rampant. Translating that imagination into reality might be a little more difficult so keep that in mind.
You have a couple of basic choices when it comes to the back plug: Flush with the back of the horn, or stand out proud. There isn’t much difference in them with respect to installation.
 Choose a piece of wood that appeals to you and trim it to shape. You can drill a hole through the middle of the chunk of wood, and put a carriage bolt through it. That way it can be mounted to a drill, or drill press. That will allow you to shape it a little easier. In addition you can do any number of things with that hole, including a threaded filler plug, inset a decorative item or a flint holder, etc.
I used an inexpensive wood lathe, and worked the rough block into a round. If you have never turned wood into something useful, you really ought to try! I mostly make handles for files and chisels, and these amateur wood lathes are inexpensive and suitable for that kind of project. I wouldn't try to turn baseball bats or bed posts in them, but they are more than adequate for billy clubs, tool handles, and making sawdust and chips!
If you are trying to turn the block on a press or clamped down hand drill, you can try to use a rasp and some sandpaper to cut it down to shape. A better tool would be an old file that you grind square, with approximately a 15 to 30 degree bevel. Properly braced you can get a very nice cut and good finish on your plug.
 Remember that about a ½” is going to be inlet into the horn. Start your bevel first, continuously test fitting the horn onto the mounted plug. Once you have the taper correct, and the depth complete, the outside dimensions can be determined and cut or ground to shape. Carefully finish the edge where the wooden plug meets the horn, and set the plug aside until final assembly.
If you were careful and scraped the horn, you can probably jump up to 320 grit wet or dry sandpaper and smooth out any blemishes or ridges that are left. If you used 100 grit sandpaper, go to 220, then 320, and finish up with 400, if you have the energy and desire. Always sand perpendicular to the last grit you used. Your finishing grit whether 320 or 400, should be sanding the horn lengthwise. The previous grit should have been done across the short way, and so on. By always sanding perpendicular to the previous grade, you will be sure of getting rid of all the scratches, leaving you a perfectly smooth horn to work with.
In the next installment we will finish our powder horn and all the parts.
Related Posts:
Making a Powder Horn Pt I: A Chronicles' Project
Making a Powder Horn Pt II: A Chronicles' Project
Making a Powder Horn: Almost There!
Making a Powder Horn Pt III: A Chronicles' Project
Best Regards,
Albert A Rasch
Member: Bagram Tent Club
Member: Hunting Sportsmen of the United States HSUS (Let 'em sue me.)
The Hunt Continues...

The Rasch Outdoor Chronicles
$g&m f9bd 45kd q!?5. trochronicles.blogspot.com
Making a Powder Horn Pt II:
A Chronicles' Project

 As I mentioned in Part I, many traditional powder horns have the spout is carved directly from the horn itself. Note the shape of the tips in the adjacent pictures. Those are carved directly from the thick portion of the horn tips.
After quite a bit of whittling, rasping, scraping, and sanding, I had what amounted to what I thought might be a pretty reasonable tip to the horn.
Now that the basic shape has been determined, the center of the spout is marked, and the first hole can be drilled.
I have to be honest; drilling the initial hole for the spout had me nervous. As you can obviously tell, the hole runs at an angle through the tip and trying to drill that and come out in the middle of the cavity isn’t hard, but it’s sure as the devil himself not easy either. You really have to think about what you are doing.
I ended up going at it from both ends. I measured the angle and depth that the spout hole had, and marked that with tape on the horn itself. Then I got a long drill bit substantially larger than the one used on the spout end and drilled to the initial bore from inside the horn.

That's probably enough for the day. Go wash up and pick it up tomorrow!

The pour spout.
After I drilled the spout hole, it was time to finish it up. More carving, whittling, rasping, filing and scraping! In the end I had what I think is a pretty attractive spout. It's a little short, and really not that svelte, but for a first try it's pretty good. I have not decided what direction I am going to take with that ring I created. Maybe decorative flats, or a tab to attach the sling to.
Now let’s work on the butt end of the horn.
You have cut it square and knocked down any ridges inside. Use some coarse sandpaper, and then finish the inside so it is smooth by scraping. You need to get it pretty smooth for about half to 3/4 of an inch so that the back plug sits securely and seats full depth.

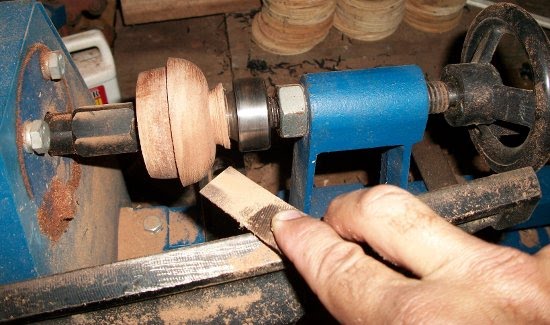
Chips flying as I turn the Sizer!
When horn is boiled it softens, becomes plastic, and can be molded to shape. But before we can round out the back end of the powder horn we have to make a “sizer.” A sizer is nothing more than a tapered piece of wood that is used to form the softened horn into a perfect circle. I would suggest looking for an old baseball or softball bat that you can cut down. It’s perfect. Otherwise you will have to whittle it out of a chunk of wood or a relatively round branch. I had a chunk of a branch sitting in the garage which I pinned in the lathe, and tapered to fit.

Home Made Turning Tools
You will notice that all my turning tools are old files that I ground down for use as skews, scrapers, and cutters. The handles are cut offs from broken shovel handles I save, or tree branches. One of my "signatures" on turned handles is a little bit of bark or knot that I leave whenever possible. I think it's a nice touch. You will learn what angle works best on the leading edge of the cutters by trial and error. I wish I could be more specific, but it seems to be different for the tool and the wood you're cutting into. I'll have to write a post on them specifically because they are relatively easy to make, all you need is a grinder and an old file, but have a couple of nuances that you need to be aware of to make them work well.

I have read that horn brought to 325 degrees F will lose all memory of its shape, whereas boiling in water to 212 F only temporarily changes the shape. In order to get to that 325 temperature, you will need to heat the horn in the oven, in a pot of oil. Boiling in water is good enough for me… For special shapes such as triangular or rectangular cross sections it is necessary to do the oil bath, so that the horn retains its shape.
The back end should now be perfectly round in shape. Time to close it up. Here you can let your imagination run rampant. Translating that imagination into reality might be a little more difficult so keep that in mind.
You have a couple of basic choices when it comes to the back plug: Flush with the back of the horn, or stand out proud. There isn’t much difference in them with respect to installation.
 Choose a piece of wood that appeals to you and trim it to shape. You can drill a hole through the middle of the chunk of wood, and put a carriage bolt through it. That way it can be mounted to a drill, or drill press. That will allow you to shape it a little easier. In addition you can do any number of things with that hole, including a threaded filler plug, inset a decorative item or a flint holder, etc.
I used an inexpensive wood lathe, and worked the rough block into a round. If you have never turned wood into something useful, you really ought to try! I mostly make handles for files and chisels, and these amateur wood lathes are inexpensive and suitable for that kind of project. I wouldn't try to turn baseball bats or bed posts in them, but they are more than adequate for billy clubs, tool handles, and making sawdust and chips!
If you are trying to turn the block on a press or clamped down hand drill, you can try to use a rasp and some sandpaper to cut it down to shape. A better tool would be an old file that you grind square, with approximately a 15 to 30 degree bevel. Properly braced you can get a very nice cut and good finish on your plug.

If you were careful and scraped the horn, you can probably jump up to 320 grit wet or dry sandpaper and smooth out any blemishes or ridges that are left. If you used 100 grit sandpaper, go to 220, then 320, and finish up with 400, if you have the energy and desire. Always sand perpendicular to the last grit you used. Your finishing grit whether 320 or 400, should be sanding the horn lengthwise. The previous grit should have been done across the short way, and so on. By always sanding perpendicular to the previous grade, you will be sure of getting rid of all the scratches, leaving you a perfectly smooth horn to work with.
In the next installment we will finish our powder horn and all the parts.
Related Posts:
Making a Powder Horn Pt I: A Chronicles' Project
Making a Powder Horn Pt II: A Chronicles' Project
Making a Powder Horn: Almost There!
Making a Powder Horn Pt III: A Chronicles' Project
Best Regards,
Albert A Rasch
Member: Bagram Tent Club
Member: Hunting Sportsmen of the United States HSUS (Let 'em sue me.)
The Hunt Continues...
Monday, April 12, 2010
Making Due With What You Have
© 2010 Albert A Rasch and
The Rasch Outdoor Chronicles
$g&m f9bd 45kd q!?5. trochronicles.blogspot.com
I've got my hands full this week, so just a link or two for now. I was cruising the net last night, and I happened upon this wicked interesting video of a fellow in Marrakesh making chess pieces with a bow lathe!
Cesking has a variety of videos on woodworking, many of which are well worth the time, if only to see how much you can do with a modest assortment of tools. All that is required is a little ingenuity and creativity!
Best regards,
Albert
Subscribe to:
Posts (Atom)